Wednesday, April 21, 2021

Sunny Studio Stamps Pegasus

 Hello friends!

I have given myself a goal of posting once a week for now to keep consistent but I am so dang excited about how this card came out that I HAD TO post it right away LOL!

I just love the look of no-line watercolor on critters.  So I knew I had to do it with this Sunny Studio Stamps Prancing Pegasus Stamp Set.  I'm also currently loving pastel rainbows!


I began by stamping the image with Ink on 3 Fade out Ink onto a piece of Bristol Smooth Cardstock.  It is a very faint ink that kind of disappears as you start coloring in your image.  Bristol gives me the best result when using my Zig Clean Color Real Brush Markers which is what we will be doing today!

I started by coloring in the pegasus' body with Light Pink.  For the hair and tail I chose pastel rainbow colors and colored them in rainbow order (ROYGBIV). I used Light Pink, Orange, Lemon Yellow, Pale Green, Light Blue and finally Lilac.  After the image was dry I drew the eyes and nostrils back in with a fine black pen before fussy cutting the image out. 


I have to say that I was giddy happy with how the coloring came out! It just has such a whimsical look.  To make it even more magical I sprayed the image with some shimmer spray.  This was a new product to me and the effect is beautiful because I love shimmer so much!!

In my head I pictured a fabulous pastel rainbow background for this beautiful Pegasus.   I created my rainbow on a piece of watercolor paper with some pastel watercolors.  Once the panel was dry I die cut it with the Frilly Frames Retro Petals Die and used the included stitched rectangle border.  


I have to admit that I have been hoarding all the little pretty pieces that came out of the panel LOL. I might have to die cut the panel in white and do some die cut inlay!  Don't you love 2 for 1 background panels??

I chose to use 2 sentiments on this card. First was a "Happy Birthday" sentiment from my stash and I die cut it from some pink glitter paper and adhered it onto a vellum shadow. I also die cut a cute little cloud (from my stash) and stamped the "Have a magical Birthday" from the stamp set onto it.  To add a little interest to my cloud I ink blended a little Pinkfresh Studio Ocean Breeze Dye Ink around the edges for a soft look.


Next it was time to assemble my card.  The rainbow background was adhered to a pink A2 cardbase with some liquid glue.  I adhered the sentiment and cloud next before finally adhering the Pegasus with some foam squares.

The finishing touch was some Sunny Studio Iridescent Pastel Confetti.  I am in love with these embellishments because they lay flat and have no holes in the middle.  They are so pretty and a great accent.

I hope you love this card as much as I do even if I'm bias LOL.

Thanks again for reading!

Jen


Tuesday, April 20, 2021

You are one of a Kind

 Hello friends! Welcome!

Today I have another card featuring some Pinkfresh Studio goodies.  In their latest release they unveiled some layered coloring stencils that coordinate with previously released stamp sets. I will be sharing the Flower Garden Stencil which coordinates with the Flower Garden Stamp Set.


I began by stamping the large floral stamp onto some smooth white cardstock with brown ink.  I then started with layer one of the stencil.  I used various shades of pink inks from Altenew for the flowers and green inks for the leaves.  I worked my way through all the layers of the stencil each time lining up the stencil openings over the corresponding parts of the image.  Because I chose to stamp the image first the corner guides on the stencils didn't quite line up with the corners of my cardstock.

I die cut the panel with the Ornate Banner Die. I decided I wanted to cut a section out and stamp my sentiment in the middle.  I cut way an inch out of the middle of the panel using my paper trimmer.


Next I adhered the floral panel to a side folded A2 white cardbase.  The top section was adhered first with adhesive runner.

I chose a sentiment from the Flower Garden Stamp Set. I stamped "You are one of a Kind" with gold pigment ink.  This ink is so gorgeous!  The sentiment was stamped just below the top portion of my floral panel.  The bottom portion of my panel was adhered right below the sentiment lining up sides with the top portion.


To add a bit more detail to my flowers I traced over the stamped lines with glitter pen.  It adds the most beautiful effect but is unfortunately hard to capture in photographs! I will have a short video on my Instagram (@jenmathis_crafts) to show up the shimmer!


The final step was to add a little bling with some white iridescent sequins!

That's my card for today! If you are looking for some quick coloring techniques check out the Pinkfresh Studio stencils!

thanks for stopping by!

Jen


Wednesday, April 14, 2021

From Me To You

Hi friends!

Today's card features some very exciting new products from Pinkfresh Studio.  Their last release (March 2021) rolled out their new FOIL PLATES! What?!!! They are so beautiful and as if that wasn't enough they have coordinating stamps, stencils and dies!

This was my first project with the set that I ordered which is called Joyful Peonies.  I of course ordered ALL the coordinating products.  Today I used the foil plate, layering stencil and coordinating die.


I started out by foiling the peonies plate on some thick white cardstock.  I've found that I usually get better results with a thicker cardstock when foiling.  I used a gold/brass color of foil from Spellbinders. The outline that it gives to the image is just gorgeous.

The layering stencils make coloring super quick and give a beautiful result.  I ink blended all the layers of the stencil with  Pinkfresh Studio Dye Ink.  I used Peach Fuzz and Apricot for the flowers and Mint and Aquamarine for the leaves. Next I used the coordinating die to cut the image out.


While I had my Glimmer Hot Foil Machine out I decided that I would also foil my sentiment.  I chose the sentiment "From Me To You" from the Spellbinders Mix & Match - Glimmer Hot Foil Kit of the Month Club. The kit also comes with a coordinating die for the sentiment.

My background panel was created by taking an ink blended panel that I had in my envelope of projects I create when I'm just playing around. Do you have one of those?? Anyway, I took this panel and die cut the Pinkfresh Studio Folk Dance die and I think it looks AWESOME!


I adhered my flower image and sentiment to the background with some foam squares.  The background panel was attached to a side folded A2 white cardbase.

To add a little more interest to my card I die cut some Pinkfresh Curvy Leaves from vellum.  I glued and tucked them around and behind my flower image.

The final step was to add some gold confetti around my sentiment.


I hope that you will check out the Pinkfresh Studio Foil Plates and coordinating products.  Foil is just so beautiful and adds a little bit of magic to your projects.

Thanks again for reading!

Jen


Friday, April 9, 2021

Rainbow of Llamas

 Hello friends!

Do you like llamas?? I love llamas because I think they are so cute.  The other day I had a vision of rainbow llamas LOL.  That being said, today I will be sharing a card with the Sunny Studio Stamps Lovable Llamas Stamp Set....in a rainbow of colors!


I started out by stamping out 6 llamas on a piece of watercolor paper.  I stamped the images in Distress Oxide Inks in the colors Kitsch Flamingo, Wild Honey, Squeezed Lemonade, Twisted Citron, Tumbled Glass and Wilted Violet.  These are my rainbow colors!

I used a wet paintbrush to activate the stamped ink and use it to "watercolor" in my llamas.  For each llama I also smooshed some of the coordinate ink color on my glass mat and sprayed it with water to create more "paint" to add in more shadows and texture.

Next I fussy cut out the llamas and drew the eyes, noses and mouths back in with a black pen.  


To create the ombre blue background I ink blended on smooth white cardstock with Distress Oxide Tumbled Glass, Broken China and Mermaid Lagoon.  The Sunny Studio Quilted Heart Embossing Folder added more texture and interest to the background.

For my frame I die cut the My Favorite Things Stitched Collage Frame from a piece of paper from the Sunny Studio Spring Fling Paper Pack.  The piece I chose really tied in the rainbow theme.  I trimmed and adhered the llamas behind the frame before attaching the frame to my blue background.


The background panel was adhered to a black cardbase which is a top folding A2 size.

My sentiment is from the Lawn Fawn All the Clouds Stamp Set.  I stamped the phrases and heat embossed them in white before trimming them to fit inside the frame sections of my card.

The finishing touch was adding some Sunny Studio Stamps Rainbow Confetti Mix.

This is such a fun and happy card! Thank you so much coming by! See you soon.

Jen

Tuesday, April 6, 2021

Cow are you?

 Hello friends! Hope you're having a lovely day!

Today I have a card with a friendly little cow from Sunny Studio Stamps. She's from the Miss Moo Stamp Set. The set has some super cute cow pun sentiments such as "Cow are You?", "I udderly adore you" and "I herd it's your birthday".


I started out by stamping the cow image on some Bristol Smooth Cardstock using Ink on 3 Fadeout No Line coloring detail ink. This ink is very faint and allows you to create a no line coloring effect because the ink fades out as you add your color medium.  

I chose to no line color with my Zig Clean Color Real Brush Markers.  I used the colors Oatmeal, Mid Brown, Light Brown, Light Pink and the colorless Blender.  I drew back in the eyes, nose and mouth with a black Gelly Roll pen and fussy cut out the image with my Cutterbee Scissors.


Next I got to work creating a cute pasture scene for Miss Moo.  I grabbed a piece of Hammermill 100lb cardstock and my Distress Oxide Inks.  The sky was created with Tumbled Glass and Broken China.  The grass was blended with Twisted Citron and Mowed Lawn and I created some splatters by mixing those 2 colors with a little water. I used a wet paint brush to lightly tap the splatters onto my cardstock being careful not to splatter on my sky.  

I also added some water splatters to the sky and patted the excess off with a paper towel.  The Distress Oxide Inks react with water and you are left with areas where the ink is "bleached" out.  It's one of my favorite features of oxide inks.

Those cute little clouds were created by die cutting the My Favorite Things Petite Cloud Dies from some white cardstock from my stash.  I added a little bit of shading for dimension with a B000 Copic Marker.   The clouds were adhered with liquid glue.

To add a little more charm to my scene I added the white picket fence.  The fence is from the Lawn Fawn Build a House Spring Add on set.  I die cut two fences and the second was trimmed for the small portion to the right of the cow to continue the fence across the panel.


I stamped the "Cow Are You?" sentiment in Pinkfresh Studio Detail Black Ink just above my cow image which was adhered with liquid glue.  At this point I felt like the bottom of my panel needed something.  I played around with a few ideas and in the end decided on adding an additional sentiment.

I pulled out my Sunny Studio Stamps Loopy Letters Die Set (I love this set) and created the word "friend" from some pink cardstock. I lined up the letters on my grid mat and glued them together so they would appear as one cohesive word written out in cursive. I then adhered the sentiment to the bottom of my panel.

Miss Moo was begging for a little bit of glam so I gave her a pretty little flower in her ear.  The original stamped image does feature a flower but I wanted to add a little more dimension.  I die cut a flower from the Spellbinders Hello & Thank You Die Set.  I adhered the flower with liquid glue and added a small rhinestone from my stash to the flower center.

I die cut the Sunny Studio Stamps Frilly Frames Lacy Eyelet Border (using just the scallop border) from a piece of paper from the Spring Fling Paper Pack.  They really have some super cute paper patterns. The cute scalloped daisies framed in my farm scene nicely.

The last step was to adhere my card panel to a card base made from some pink cardstock.  The card is a side folded A2.

So Cow are You today??

Thanks for stopping my little Blog!

Jen

Sunday, April 4, 2021

Hoppy Easter!

 Happy Easter friends!

One last Easter card for the year.  I really had fun sharing all these Easter cards all week and I hope you enjoyed all the bunnies.

For my final bunny card I used two of the cute bunnies from the Lawn Fawn Eggstra Amazing Easter Stamp Set. I colored the bunnies with copic markers after stamping them with Memento Tuxedo Black ink on Hammermill 100lb cardstock. (Copics: E30, E31, E33, R20)


My background panel was created by ink blending the Grimy Dots stencil by Craftreats in Pinkfresh Studio Soft Lilac ink.  I die cut the panel using the Pinkfresh Diagonal Stitched Rectangle Die and adhered it to a top folded A2 note card.

The inked hexagon die cuts I actually created a while back so I don't remember the ink colors I used. I will often play with my supplies and then save what I create to be used as projects come up. The hexagon dies are off brand from my stash. I adhered them to my card with liquid glue.


I created the "Hoppy" sentiment with the Concord & 9th Double Cut Alphabet Die Set from some black cardstock. I used the outside portion of each letter only.  The "Easter" portion of the sentiment was die cut from the Sizzix Tim Holtz Tiny Type Lower Case from white cardstock and adhered to black cardstock. Both sentiments were adhered with liquid glue.


After adhering my bunnies to my card I felt that the card still needed something.  I got out my Spellbinders 24 Carrot Die Set and die cut a bunch of the little flowers from black and purple carstock.  I scattered and adhered the flowers and applied some Icicle Stickles to the centers.


That's my card! I hope you have a lovely Easter and appreciate you so much!

Jen 


Saturday, April 3, 2021

You Sparkle

 Hello and thanks for stopping by today!

Today's card is a lovely card featuring the Sunny Studio Stamps Captivating Camellias Stamp Set.  This is a layering floral set with some great sentiments.  The detail of the florals is truly amazing.

I started by stamping the larger of the two florals in two different color combinations.  Each floral has four layers. I realized after some experimenting that I prefer stamping the images in the opposite order than they are labeled. For example for the florals I start with 1D and work my way backward. 

My first color combination was Pinkfresh Studio Dye Ink in the colors Peach Fuzz and Apricot.  I stamped layer 1D & 1C in peach fuzz and layers 1B & 1A in Apricot. The leaves were stamped in the colors Mint and Key Lime. I die cut the images using the coordinating dies. An additional layer for each image was die cut from white cardstock and adhered to the back to add dimension.


I am in love with how the background panel came out! I recently picked up the Sunny Studio Stamps Frilly Frames Retro Petals Die and it's gorgeous let me tell you.  I ink blended some Distress Oxide Ink in the colors Spun Sugar, Kitsch Flamingo and Wild Honey onto a piece of Hammermill 100lb white cardstock. I die cut the Retro Petals Die from the ink blended cardstock and this color combo is just beautiful!!

I chose the sentiment "You Sparkle" as an encouraging message for the card's recipient.  The word "Sparkle" was cut from the Sunny Studio Stamps die cut of the same name using some black cardstock.  The "You" was die cut using the Loopy Letters Die Set in some pink holographic cardstock from my stash.  To make sure my die cuts were not lost on the intricate background panel I adhered them to some vellum that was trimmed to 1 1/2" x 4 3/4".


I adhered the background panel to a piece of Hammermill Cardstock that was trimmed to A2 size.  I then adhered my vellum with my sentiments attached to the panel and wrapped it around the edge to hide the ends.

Since I am a lover of the color pink I chose this for my cardbase and adhered my panel using Scrappy Tape. I arranged my florals and placed them onto my card using liquid glue.

The last step was a bit of pretty Sunny Studio Stamps Iridescent Pastel Confetti which are officially my favorite new bling! So pretty!!


This card makes me happy for Spring!

Thank you so much for taking the time to stop by!

Jen


Friday, April 2, 2021

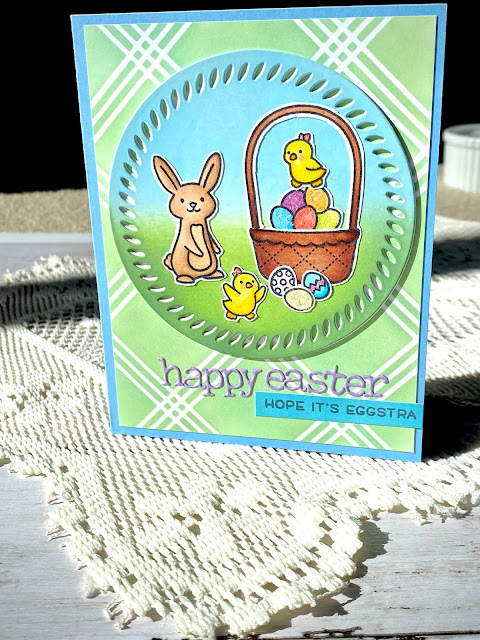
Eggstra Amazing Easter

 Hi friends! It's almost Easter but we have a little more time for some Easter cards!

Today's card features the Lawn Fawn Eggstra Amazing Easter Stamp set.  This set has the cutest little bunnies and chicks. I started by stamping one of the bunnies, the two chicks, basket and eggs in Memento Tuxedo Black Ink onto Hammermill 100lb white cardstock.

The images were colored with Copic Markers.

Bunnies: E30, E31, E33  Chicks: Y13, Y19, R22 (bow)  Basket: E15, E18  Eggs: assorted colors


I fussy cut out all the images and then got started on the little scene that our critters are hanging out on.  I die cut the Pinkfresh Studio Braided Circle Die from Hammermill carstock 2 times.  The sky was created with Tumbled Glass and Speckled Egg Distress Oxide Ink and for the grass I used Mowed Lawn and Rustic Wilderness.  The second circle was adhered to the back of the ink blended circle to create some dimension.

I have really been loving stencils lately.  They are so affordable and Pinkfresh Studio makes their stencils so easy to use.  I used their Diamond Plaid stencil for this card.  It was ink blended in Cracked Pistachio Oxide Ink. I only stencil #1 on this panel and then I trimmed it to 4 x 5/14.


I have also been loving the Sizzix Tim Holtz Tiny Type Lower die set.  I used the set to diet cut the "Happy Easter" from some purple cardstock from my stash.  This was a great way to use up some scraps as the dies are tiny! I used the grid on my mat to get the spacing of my letters right and then used some washi tape to transfer the sentiment to my card.  I adhered it with some liquid glue.

I love to create my own custom cardstock! It allows me to match everything perfectly on my card. All I had to do was ink blend some Tumbled Glass ink onto a piece of white cardstock.  I stamped the "Hope It's Eggstra" sentiment from the stamp set in Memento Black Ink and trimmed the cardstock with my paper trimmer.


After adhering my stenciled panel and circle scene onto a card base I began arranging my images.  Once I was happy with the layout I adhered everything with liquid glue.  I added Glossy Accents to the bunny's nose and the chicks beaks.

My two sentiments were adhered below my Easter scene.  The final step was a little bling courtesy of Icicle Stickles which I applied to the eggs and the little bows on top of the chick's heads.

This card really is very sweet! Hope you enjoyed.

Jen

Thursday, April 1, 2021

Watercolored Bunnies

 Hi! I'm back today with more bunnies!!

A lot of times I'll get a new product and just want to play around with it and that is how this card was created.  I started by ink blending the beautiful Hero Arts Floral Background Stencil on Hammermill 100lb white cardstock. I chose Distress Oxide Inks in the colors Kitsch Flamingo, Wild Honey and Speckled Egg.  I saw Laura Bassen (@laurafadora on Instagram) use that combination recently and loved it! 


 The result was so lovely that I knew it would be the perfect backdrop for some cute bunnies.

I die cut the Spellbinders 24 Carrot set from some watercolor cardstock and watercolored the images.  I used my Paul Ruben Glitter watercolor palette to paint the carrot and stems in the shades Deep Interference Orange, Royal Gold, Fruit Green and Dark Green. These paints are so shimmery that it makes me squeal with excitement every time I use them!

The little bunnies were watercolored in a combination of Kuretake Gansai Tambi Yellow Ochre and Brown from the Paul Ruben palette.  I used a R20 Copic Sketch Marker to color the bunny noses and a black Gelly Roll pen to color in the eyes and mouths.  I mixed a little water with White Gold paint from the Kuretake Starry Nights palette and used a wet paintbrush to add splatters to my stenciled background.


I wanted more of the Kitsch Flamingo color on my card because...it's Kitsch Flamingo!  So I created a pink frame with the Pinkfresh Studio Stitched Scallop Rectangle Die Set. This was cut out of a Kitsch Flamingo ink blended piece of Hammermill 100lb cardstock. I used some liquid glue to adhere the frame to my card panel.

For my sentiment I used a piece of the leftover Kitsch Flamingo cardstock that I created and heat embossed the phrase "Happy Easter" in WOW Opaque Bright White embossing powder.  The sentiment is from the Lawn Fawn Eggstra Amazing Easter Stamp Set.  A piece of gold mirror cardstock adhered behind the sentiment added a little pop of fun!


I adhered my bunnies and carrot to the card panel using some liquid glue.  My sentiment was placed in the upper left corner.

The finishing steps were adhering my card panel to a top folded A2 card base and placing some blue rhinestones around the sentiment for some bling!

I really do love how those big beautiful flowers look in the background! 

Thanks again for stopping by!

Jen


Back to Top